Setting up a git server

I would like my students working on projects in teams. They will need a version control system for this.1

Alternatives

I have experimented a bit with Gitlab, but it required to much effort setting up and keeping the server running stable. Rather by chance I found Gogs - Go Git Server. There is a fork called Gitea - Git with a cup of tea. I preferred Gitea, because the development of Gogs froze in the past several times. Gitea is supported by a larger team while Gogs has only two project members. Never the less the documentation of Gogs seems to be better structured and cleaner. The difference between the two project seem to be marginal at the moment.

Setting up a Ubuntu Server 16.04 LTS

It is possible to install Gitea on a Ubuntu server. I prepared the basic Ubuntu server with an OpenSSH server with the following steps. It is at your own descretion wether to run the server natively or on a virtual machine. You may even run Gogs or Gitea as a Docker container. This is also quite easy.

Setting up a virtual machine with Ubuntu Server 16.04 LTS

Most of the time I run my servers as KVM - Kernel based Virtual Machines. Creating the virtual machine is just a breeze with the following command.

virt-install --connect qemu:///system \
  --name gitserver \
  --ram 1024 \
  --disk path=/var/lib/libvirt/images/gitserver.qcow2,size=100,format=qcow2 \
  --vcpus 1 \
  --network bridge=br0 \
  --graphics none \
  --console pty,target_type=serial \
  --location 'http://archive.ubuntu.com/ubuntu/dists/xenial/main/installer-amd64/' \
  --extra-args 'console=ttyS0,115200n8 serial'

You may use also Xen, VirtualBox, VMware or any other virtualisation environment.

Installing git and creating the user git

We will need git on our server for sure. This has to be installed. It would be possible running version control with the server now, but it sure lacks the comfort anyone expects in the times of Github.

sudo apt install git

The Gitea server should run as a normal user with no special privileges. The following command will create the user git for this.

sudo adduser git

Installing MariaDB and creating a database

Gitea as well as Gogs needs a database. The options are MySQL (MariaDB), PostgreSQL, SQLite3, MSSQL und TiDB. There is no recommendation to be found in the documentation of both projects. Finally, I decided to use MySQL (MariaDB) just because I have some experience with MySQL. The following command will install it on the Ubuntu server.

sudo apt install mariadb-server

The database setup just needs two SQL statements for creating the database and granting the user git full access.

CREATE DATABASE IF NOT EXISTS gitea CHARACTER SET utf8 COLLATE utf8_general_ci;
GRANT ALL ON gitea.* to 'git'@'localhost' identified by '<password>';

Writing these statement into the file create_gitea.sql allows us setting up the database with the following command.

sudo mysql -uroot < create_gitea.sql

Installing and configuring Gitea

You may start the Gitea installation and configuration after these preparations. The installation from a binary file seems the easiest to me. You only have to download the file as the user git into a suitable directory and run it:

su git
cd ~
mkdir gitea
cd gitea
wget -O gitea https://dl.gitea.io/gitea/1.0.0/gitea-1.0.0-linux-amd64
chmod +x gitea
./gitea web

Now the Gitea server is running and you may configure it.

Configuring

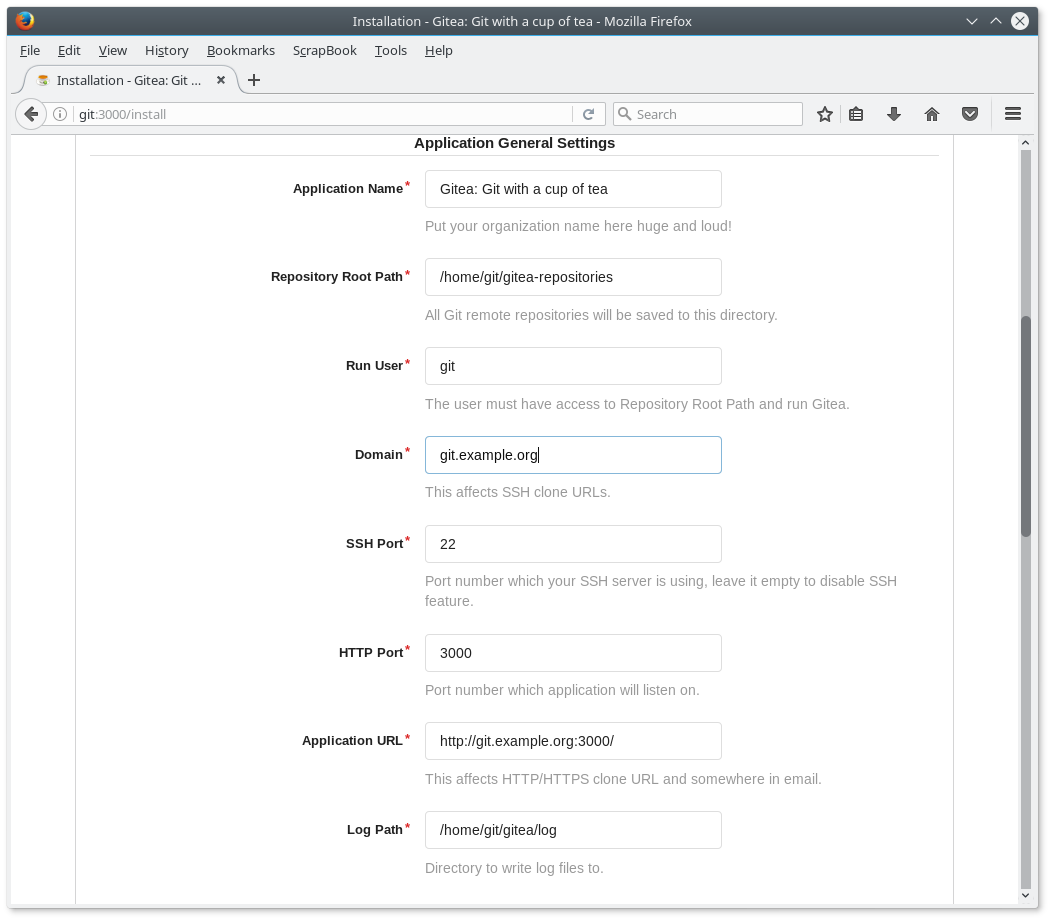
You configure Gitea in the web browser at the address shown at the console (e.g. http://git:3000/).
gitea_install_1.png

Figure 1: Configuring first part

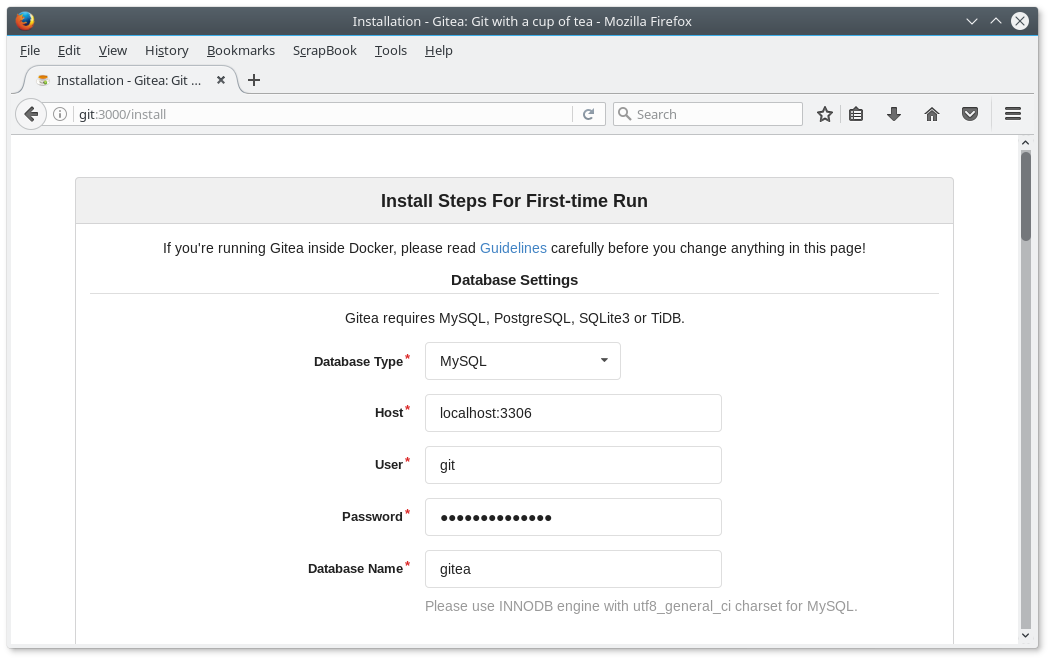
gitea_install_2.png

Figure 2: Configuring second part

I do not need a mail server at the moment, so I decided not to configure it for now (see figure 3), but I do not want self registration and would like only signed in users to view the pages
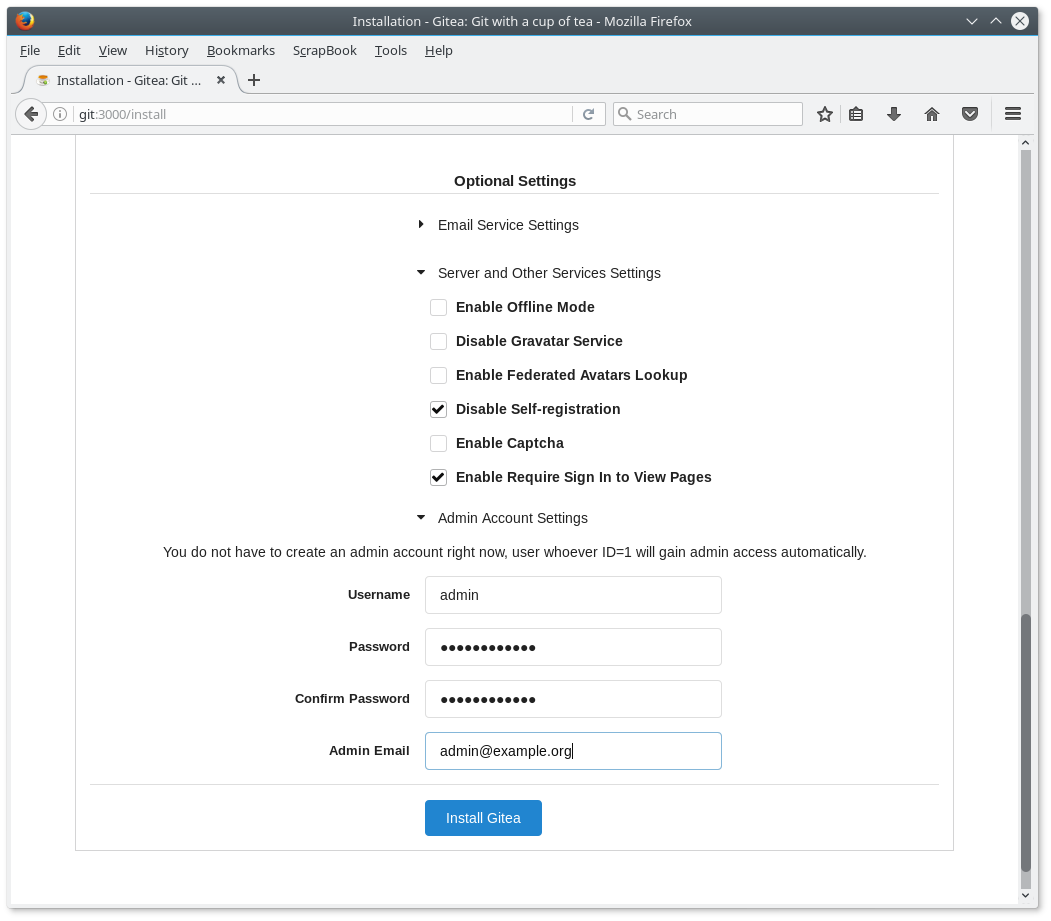
gitea_install_3.png

Figure 3: Configring third part

Using user accounts from Active Directory

The students have already an account at school. An additional authentication method must be added to allow the students to log in with their standard credentials.
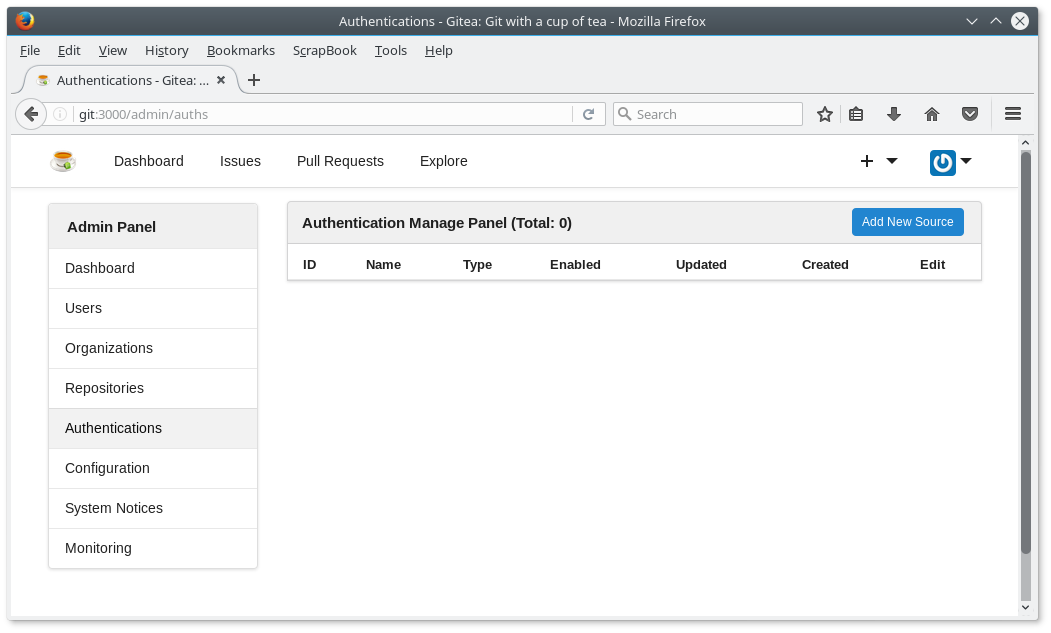
gitea_active_directory_1.png

Figure 4: Adding LDAP (AD) authentication
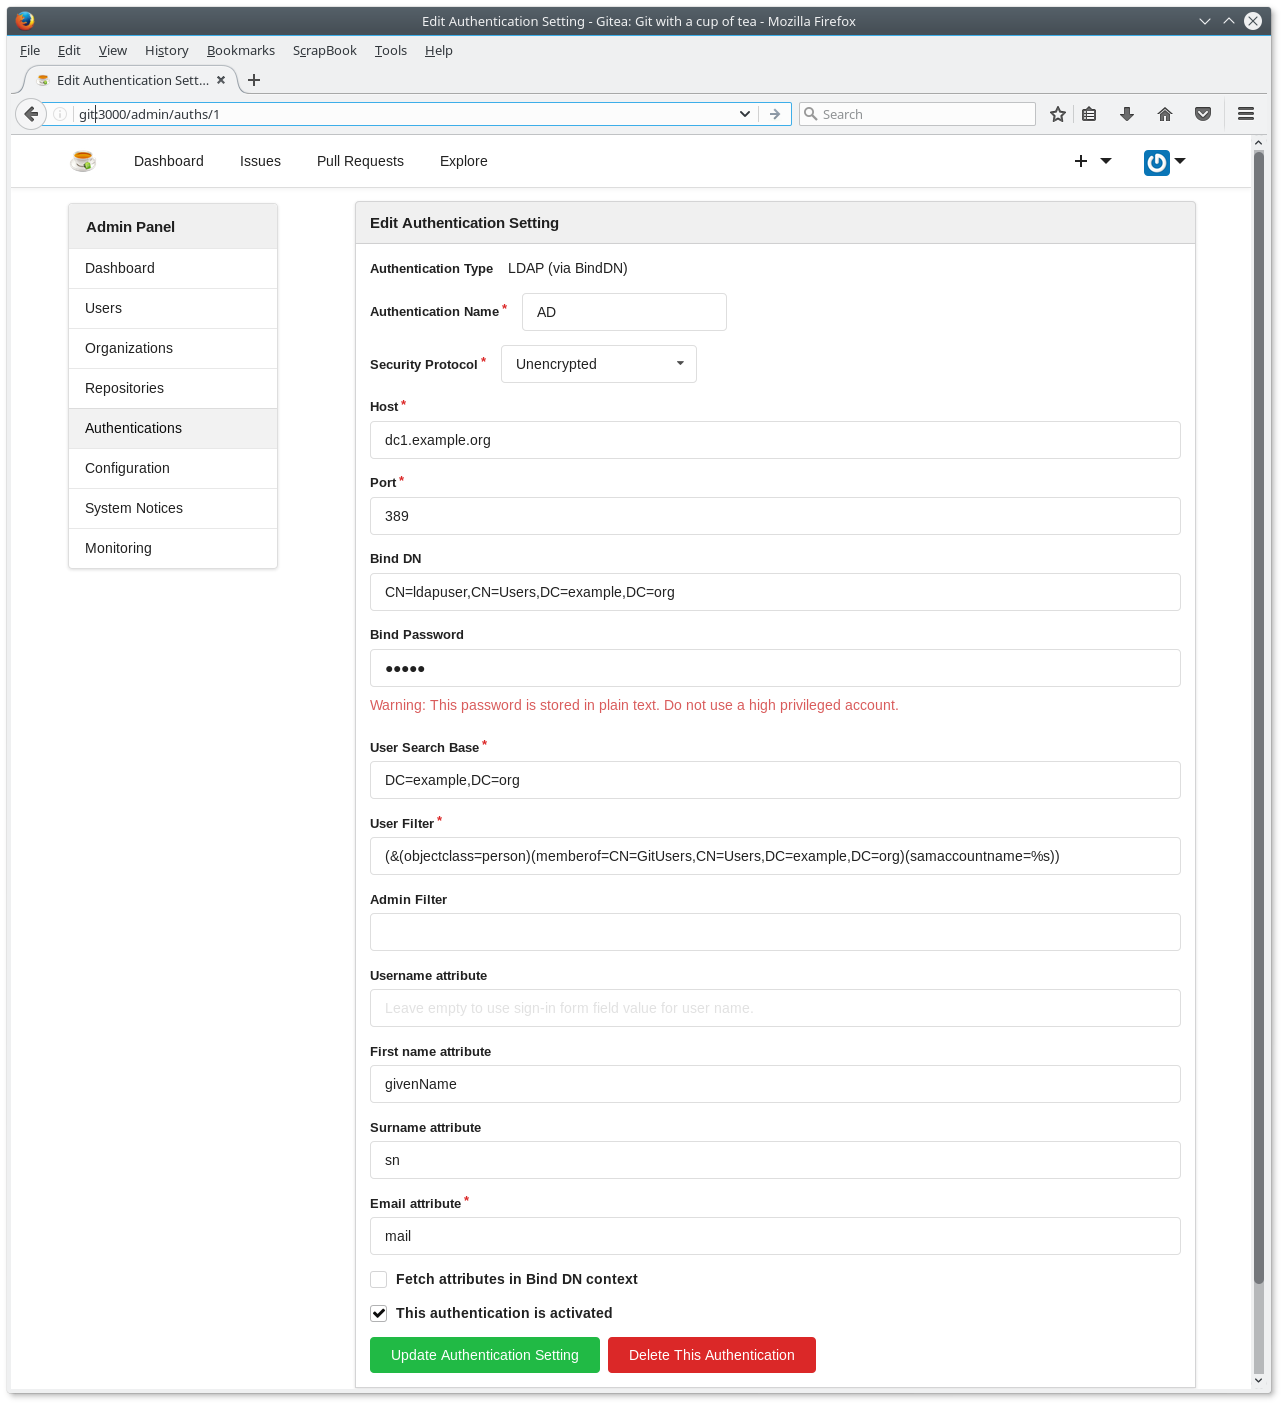
gitea_active_directory_2.png

Figure 5: Configuring LDAP (AD)

The Gitea is now completely set up. We stop the running process with CTRL-C and log out as user git.

Systemd

You have to tell Systemd to start the Gite server on system startup. This is done by creating the file /lib/systemd/system/gitea.service with the following content.

[Unit]
Description=Gitea (Git with a cup of tea)
After=syslog.target
After=network.target
After=mysqld.service
#After=postgresql.service
#After=memcached.service
#After=redis.service

[Service]
# Modify these two values and uncomment them if you have
# repos with lots of files and get an HTTP error 500 because
# of that
###
#LimitMEMLOCK=infinity
#LimitNOFILE=65535
Type=simple
User=git
Group=git
WorkingDirectory=/home/git/gitea
ExecStart=/home/git/gitea/gitea web
Restart=always
Environment=USER=git HOME=/home/git

[Install]
WantedBy=multi-user.target

… and enabling and starting the service with Systemd.

sudo systemctl enable gitea.service
sudo systemctl start gitea.service

Our Gitea server is now available.

Footnotes:

1

The students could simply use Github repositories, but that is a no go. Every student would have to create a Github account. That is not acceptable. Furthermore, teaching and learning always needs a protected environment.

Physics with Nikola

I would like to use LaTeX notation in physics texts. Thankfully, there is MathJax. MathJax renders LaTeX formulas in HTML documents for quite some time.

A simple mathematical formula:

\( a^2 + b^2 = c^2 \)

But physics require the rendering of a value with a unit. I use the siunitx package in LaTeX for this. These commands where not available in MathJax for a long time. There is a MathJax extension available since one year. This extension provides some of the functionality of the LaTeX package. Especially, the \sisetup command is not working. The format of the output is not customizable as in LaTeX.

\begin{equation} \Delta s = \SI{4.5e-2}{\meter} \end{equation}

Zertifikate von Let's Encrypt verwenden

Installing acme-tiny

My favorite Let's Encrypt clients is acme-tiny. It is just a very short Python script, which makes a code review easy. Som preparations must be done with OpenSSL. acme-tiny does not require root privileges. It just works. The user lets has to exist on an OpenBSD system with an nginx web server for the following description.

Creating the directoy structure

Create the following directories in the home directory of lets.

mkdir bin
mkdir src
mkdir reqs
mkdir certs

Cloning the repository

There may be updates of the script in the future. To facilitate this we are cloning the Github repository into the src directory.

cd src
git clone https://github.com/diafygi/acme-tiny.git
cd

Now you should always review the source code of the script. If the code review is showing no issue, we are copying the script into the bin directory.

cp src/acme-tiny/acme_tiny.py bin
chmod +x bin/acme_tiny.py

Creating a private key for the Let's Encrypt account

You will need a key pair for the account. The following command will generate a private and a public key for your account. The private key should only be readable by the user lets.

openssl genrsa 4096 > account.key
chmod 400 account.key

Creating a certificate signing request (CSR)

You must create a a domain key pair and certificate signing request for each domain. The certificate signing request contains the public key for the domain. It will be send to Let's Encrypt for signing.

openssl genrsa 4096 > example.key
openssl req -new -sha256 -key example.key -subj "/CN=example.com" > ./requests/example.csr

Only the server process will require the private key from now on. I move it as user root (sudo/doas) into the /etc/ssl/private directory, where only root can access it.

It is also possible to request one certificate for several domains, but I do not use this at the moment.

Configuring the challenges directory

Let's Encrypt must verify the you have control over the requested domain. This is done by checking a special file that the acme-tiny client puts on the web server at http://domain/.well-known/acme-challenge/....

server {
    listen 80;
    server_name example.com;

    location /.well-known/acme-challenge/ {
        alias /var/www/challenges/;
        try_files $uri =404;
    }

    ...
}

This step kept me for quite some time. The reverse proxy did search in the wrong directory, but the configuration seemed to be quite in order. I had to restructure my nginx configuration files. Now it is working like a charm. The lesson learned is: Do not overoptimize configuration files.

Now we have completed the preparations for the certificate requests.

Requesting a certificate

The following command request the certificate for the example domain.

python acme_tiny.py --account-key ./account.key --csr ~/requests/example.csr --acme-dir /var/www/challenges/ > ~/certs/example.crt

Normally a server requires a certificate chain. The certificate chain is a file with the concatenation of the domain and the intermediate and root certificate of the certification authority. The following steps create this file.

curl -fsS https://letsencrypt.org/certs/lets-encrypt-x3-cross-signed.pem -o ~/certs/intermediate.pem
cat ~/certs/example.crt intermediate.pem > /etc/ssl/lets/example-chained.pem

This shows the trick to separate the privileges. The domain's private key (example.key), which is only required during creation of the certificate request and aftewards by the server, is stored in a directory only accessible by root. The directory with the certificates (/etc/ssl/lets/) is owned by lets who has only normal user privileges. Everybody has readonly access.

Certificate renewal

Since the certificate is only valid for 90 days, you must request a new one before expiration. You may use the same call of acme-tiny.py like shown above. Since we are running OpenBSD it is advisable to write a script and run it using cron. The following script works with OpenBSD for other unix like operating systems you have to adapt the script. Let's call it renew_cert.sh.

#!/bin/sh
# Renew certificates with Let's Encrypt

base="/home/lets"
alias acme_tiny="$base/bin/acme_tiny.py"
chaineddir="/etc/ssl/acme"

accountkey="$base/account.key"
reqsdir="$base/reqs"
certsdir="$base/certs"
challengedir="/var/www/challenges"
intermediate_cert="$certsdir/intermediate.pem"
intermediate_cert_url="https://letsencrypt.org/certs/lets-encrypt-x3-cross-signed.pem"

echo "Downloading intermediate certificate..."
# get intermediate certificate with curl
# -f: fail without writing html garbage to output file
# -s: silent mode without progress meter
# -S: output error message if download fails
curl -fsS $intermediate_cert_url -o $intermediate_cert && echo "Success."

# The script continues even if the download of the intermediate
# certificate fails. The old intermediate certificate should still
# exist and be useable.

for csr in $reqsdir/*.csr; do
  domain=`basename $csr .csr`
  echo "Requesting certificate for $domain..."
  acme_tiny --account-key $accountkey --csr $csr --acme-dir $challengedir > $certsdir/$domain.crt || (echo "Failed!" ; exit)
  echo "Success."
  cat $certsdir/$domain.crt $intermediate_cert >$chaineddir/$domain-chained.pem
done

echo "Reloading web server configuration..."
doas /usr/sbin/rcctl reload nginx || (echo "Failed!"; exit)
echo "Success."

After renewal the web server must load its configurtion again. The user lets should do this after renewing the certificate, but he needs the privileges for this. The can be done with a simple line in the doas configuration file /etc/doas.conf. The user lets may now reload and only reload the web server configuration. For other operating systems you may achieve similar effects with the sudo configuration.

permit nopass lets as root cmd /usr/sbin/rcctl args reload nginx

cron will now request a new certificate each month with the following crontab. I like it when I receive mail from my script each time it runs.

MAILTO=cert@example.com
0 0 1 * * $HOME/bin/renew_certs.sh